通用校正標準片
產品介紹
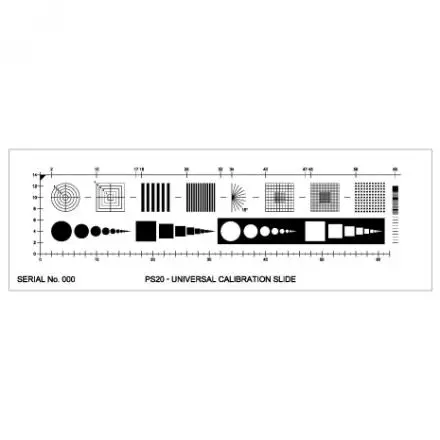
INTRODUCTION >> Universal Calibration SlidePS20 是一款多功能且經濟實惠的通用校正標準片解決方案,適用於顯微鏡、機器視覺光學檢測系統和3D掃瞄系統的單位校正與測量校準使用。其玻片上包含 13 個不同的圖案(影像區域),以滿足多種校準參數:同心圓和正方形(Concentric Circles and Squares)、線形光柵(Line Gratings)、網格與點陣列(Grid & Dot Arrays)、幾何根號 2 級數的點與方形區塊,以及由粗到細變化的線性刻度。每片玻片均具有唯一的永久序號,並可針對個別圖案,提供具國際追溯性的校準報告(須選購)。
The PS20 was designed as a multi-purpose and cost-effective solution for measurement calibration of microscopes and machine vision systems. The slide includes 13 different image areas to satisfy numerous calibration parameters : Concentric Circles and Squares, Line Gratings, Grid & Dot Arrays, Geometric root 2 progression of Dot and Square blocks as well as coarse and variable fine linear Scales. Each glass slide has a unique permanent serial number and can be supplied with an internationally traceable certificate of calibration on individual patterns.
Multiple images on a slide provide the most cost-effective solution to calibration and resolution checking of microscopes and image analysis systems. The combination of scales, dots, circles, squares, rulings, grids and angles can be supplied with an internationally traceable certificate of calibration for those who require ISO conformity.
Pattern Details
Starting from a fixed ‘Datum point’ mark,each individual pattern or array can be located using X,Y coordinates. When requesting a quote for the calibration of individual patterns, you can use the ID letter to identify which pattern you would like to have calibrated.
| ID | Pattern Name | Location | Description |
| A | Concentric Circles | X:02 Y:10 | 1, 2, 3, 4, 5 mm Circles with Cross Line and identifier. Line width 20µm |
| B | Concentric Squares | X:10 Y:10 | 1, 2, 3, 4, 5 mm Squares with Cross Line and circle. Line width 20µm |
| C | Line Grating 25 lines/mm | X:18 Y:10 | 12.5 line pairs per mm (40µm line 40µm space) |
| D | Line Grating 100 lines/mm | X:26 Y:10 | 50 line pairs per mm (10µm line 10µm space) |
| E | Half Protractor | X:34 Y:10 | 15° Spacing. Line width 20µm |
| F | Grid Array Coarse | X:40 Y:10 | 5mm/0.5mm square array + central 2mm/0.25mm square. Line width 20µm |
| G | Grid Array Fine | X:48 Y:10 | 5mm/0.1mm square array + central 2mm/0.05mm square. Line width 8µm |
| H | Dot Array | X:56 Y:10 | ø0.25mm Dot, 0.50mm centre to centre spacing. 11x11 grid = 121 dots |
| I | Geometric Progression Opaque Dots | X:02 Y:04 | Root 2 progression of 21 dot shapes from 3.5µm to 3.5mm. |
| J | Geometric Progression Opaque Squares | X:17 Y:04 | Root 2 progression of 21 square shapes from 3.5µm to 3.5mm. |
| K | Geometric Progression Clear Dots | X:32 Y:04 | Root 2 progression of 21 dot shapes from 3.5µm to 3.5mm. |
| L | Geometric Progression Clear Squares | X:47 Y:04 | Root 2 progression of 21 square shapes from 3.5µm to 3.5mm. |
| M | Vertical Scale Fine Variable | X:63 Y:02 | 10mm Scale with 5mm/0.5mm divisions, 4mm/0.1mm, 1mm/0.01mm. Line width respectively 20µm, 10µm, 3µm. |
| N | Horizontal Scale Coarse | X:00 Y:00 | 62mm Scale in 2mm and 1mm divisions. 20µm line width. |
產品總覽
Products >> Stage MicrometerPS20 Universal Calibration Slide
Calibration Slide for Machine Vision and Image Analysis Systems. 13 different image areas.
For UKAS Calibration Certificate, please contact us for further information.
PS20T Universal Calibration Slide
Calibration Slide for 3D Scanner Systems. 13 different image areas.
For UKAS Calibration Certificate, please contact us for further information.


